Registering a Community User
From ToddWiki
Registering a patron is a VERY DETAIL ORIENTED process. Please be extremely thorough and follow ALL steps carefully.
Required Fields
| Tab | Field |
|---|---|
| Basic Info | Title |
| First name | |
| Preferred name | |
| Middle name | |
| Last name | |
| Library | |
| Profile name | |
| Privilege | PIN (will require override password) |
| Demographics | Birth date |
Pre-Registration Screening
- Before registering a new community borrower, confirm that the user does not already have an X number.
- If the patron does not know if they have an X number, try to search by patron name using the "User Search" gadget in the Display User wizard.
- If the patron is are found in the system with an X number you are NOT permitted to tell them their X number.
- If the patron is still not found you should encourage them to visit Registration and Records to get their own X number, however they will need to be registered in Workflows manually before they can use the library's resources.
Step by Step Registration Walk Through
Creating a New Account
- Select the "User Registration" wizard from the "Users" group of wizards on the Circulation Tab.
- A new user form will appear, with an automatically generated ID for the user.


Basic Info Tab

- Confirm the “Library:” field is set to your current library, "TODD", "AURORA", COPLEY" and that the “Profile name:” is set to “Community”.
- Enter the Title information into the title field. Waubonsee only uses "Mr", "Ms", and "Dr" for titles.
- Please pay attention to the capitalization.
- Do NOT enter any punctuation.
- Enter the user's first name next. There is an additional field in which you may enter a "Preferred name" and then check the box to the right of it if the patron prefers to go by a nickname or shortened first name.
- If there is a middle name or initial enter it into the Middle Name field.
- Enter the last name in the field provided for Last Name.
- Click the Tab for “Privilege” to continue the registration process.
Privilege Tab

- On the “Privilege” Tab enter the patron’s date of birth in MMDDYY format, without using any separators, into the PIN field. You MUST use six digits of the date of birth or the patron will not be able to place holds, or renew materials.
- Enter your override password into the “Override” field to the right of the PIN field. This is required to set the PIN correctly.
- Enter the automatically generated ID number into the "Web site login (X number):" field, followed by your override password into the “Override” field to the right.
- Now click the “Demographics” tab to continue the registration process.
Demographics Tab

- In the “User cat1” field select the appropriate sex from the dropdown box.
- In the “Birth date:” field, enter the patrons full date of birth using / as a separator, using MMDDYYYY format. Eg.: 10/31/1976
- Now click the “Address” tab to continue the registration process.
Address Tab

- Fill in all available information on the “Address” tab, beginning with Day Phone, Home Phone and/or Cell Phone.
- The DAYPHONE field is used for the phone number the patron can be reached at during normal business hours. This is typically their work phone number, but can also be their Home or Cell Phone number.
- Make sure that when entering a phone number you format the number using periods as separators. For example, use 630.466.7900 not (630) 466-7900.
- The proper abbreviation for the State of Illinois is: IL
- Sugar Grove, IL
- Be sure to enter an e-mail address if available.
- If the user would like to receive notifications via Text Messages, click the “SMS Notice Contact Info” tab to continue the registration process, otherwise skip to the Final Registration Steps section.
SMS Notice Contact Info Tab

- Before adding a phone number for Text Messages (SMS), please inform the patron that while the service is very low volume (most people see only one or two messages a year) "STANDARD TEXT MESSAGING RATES MAY APPLY BASED ON YOUR PLAN WITH YOUR MOBILE PHONE CARRIER. As text message delivery is subject to your mobile carrier network availability, such access and delivery is not guaranteed."
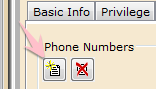
- To add a new contact number for a patron to receive SMS notification, start by clicking the "Add Phone" icon below the "Phone Numbers" header.
- In the Label Field, enter "Cell Phone".
- Next confirm that the users cellular phone number is indeed a US number, if not, select the appropriate country.
- Enter the Cellular Phone number in the "Phone Number" field. This time, enter only numbers. The field will not accept any other characters.
- Finally click each check box to select the types of notices the patron will receive.

Final Registration Steps
- Click the “Save” button to register this new community borrower.
- If you receive an error “Override required” you have forgotten to enter your override password in the specified field on the “Privilege” tab.
- If you receive an error "Please enter the user's phone number" you have left the phone number entry on the "SMS Contact Info" tab empty. Either Add the patrons phone number, or click the "Remove Phone" button to remove the empty line.
- You may provide the patron with their automatically generated library User ID so that they may place holds, or renew items in the library catalog.
Adding an X Number
If the Community Borrower has just returned from Registration and Records with their newly assigned X Number you will now need to modify the user to add the X number.
- Click "Modify User" to make changes to the patron.
- If the patron you need to modify is not currently displayed on the Modify user screen use the User Search gadget to locate the user in question.
- Once the user is displayed click the "User ID:" box in the Basic Info tab and enter the patrons correct X Number in this field.
- Next click the "Privilege" tab, and enter the X number a second time in the "Web site login (X number):" field.
- Enter your Override password in the Override: field.
- Click "Save" to save the changes.
- If you receive an error that the user already exists make certain that you have entered the information correctly. If the information was entered correctly then make note of the account with the generic ID, and place a MantisBT call (Project: Symphony/Workflows Category: Patron Account Issue) to have the two records merged.
